Connect your Brevo account
Send member email from your own domain through your Brevo account, with delivery tracking in the email log.
By default, email to your members comes from the FitManager platform address. Connect your own Brevo account and the same email goes out from your address, for example hello@yourgym.com, under your gym's name. Members recognise the sender, replies reach you, and every message shows up in your email log with its delivery status.
Brevo is the only email provider FitManager connects to. There is no SMTP option.
What goes through your account
Once the connection is Active, these emails are sent through Brevo from your sender:
- Welcome emails, login details and portal password resets
- Membership expiry reminders, payment receipts and class reminders sent by email
- Online checkout confirmations, gift cards and kiosk invoices
- Employee invitations and "your export is ready" emails
Newsletter campaigns are sent separately and are not affected by this connection. See Newsletter.
Before you start
- You need the Manage settings permission in FitManager.
- Your plan must include your own email provider. Without it, the page shows Bring your own email provider instead of the form.
- You need access to the DNS settings of your domain (at your registrar or hosting company), because Brevo asks you to add a few records.
- Allow about 30 minutes. DNS changes can take up to a few hours to be visible to Brevo.
Step 1: Create a Brevo account
- Go to brevo.com and sign up. The free plan is enough to start; it has a daily sending limit, so check Brevo's pricing if you have many members.
- Confirm your email address and finish the onboarding questions about your company.
Step 2: Add and authenticate your domain
Authenticating your domain proves to Gmail, Outlook and others that Brevo may send on your behalf. Without it your email is much more likely to land in spam.
- In Brevo, open the account menu at the top right and choose Senders, Domains & Dedicated IPs.
- Open the Domains tab and click Add a domain.
- Enter the domain you send from, for example
yourgym.com. - Brevo shows the DNS records to add: a Brevo code (TXT), DKIM records and a DMARC record (TXT on
_dmarc). Keep this page open. - In a new tab, sign in to your domain's DNS host and add each record exactly as Brevo shows it. Copy the values, do not retype them.
- Back in Brevo, click Authenticate this email domain. If a record is not found yet, wait a while and try again.
If you already have a DMARC record on _dmarc, do not add a second one. Keep yours; it works with Brevo.
Step 3: Add and verify the sender
- In Senders, Domains & Dedicated IPs, open the Senders tab and click Add sender.
- Enter the name members should see, such as
Titan Fitness, and the email address, such ashello@yourgym.com. Use an address on the domain you authenticated. - Confirm the sender. Brevo emails a code to that address, or marks it verified at once when the domain is already authenticated.
Write down the sender email exactly as it appears in Brevo. FitManager looks it up by that address.
Step 4: Create an API key
- In Brevo, open the account menu and choose SMTP & API.
- Open the API Keys tab and click Generate a new API key.
- Name it
FitManagerand click Generate. - Copy the key. It starts with
xkeysib-. Brevo shows it only once, so paste it into FitManager straight away.
Step 5: Connect in FitManager
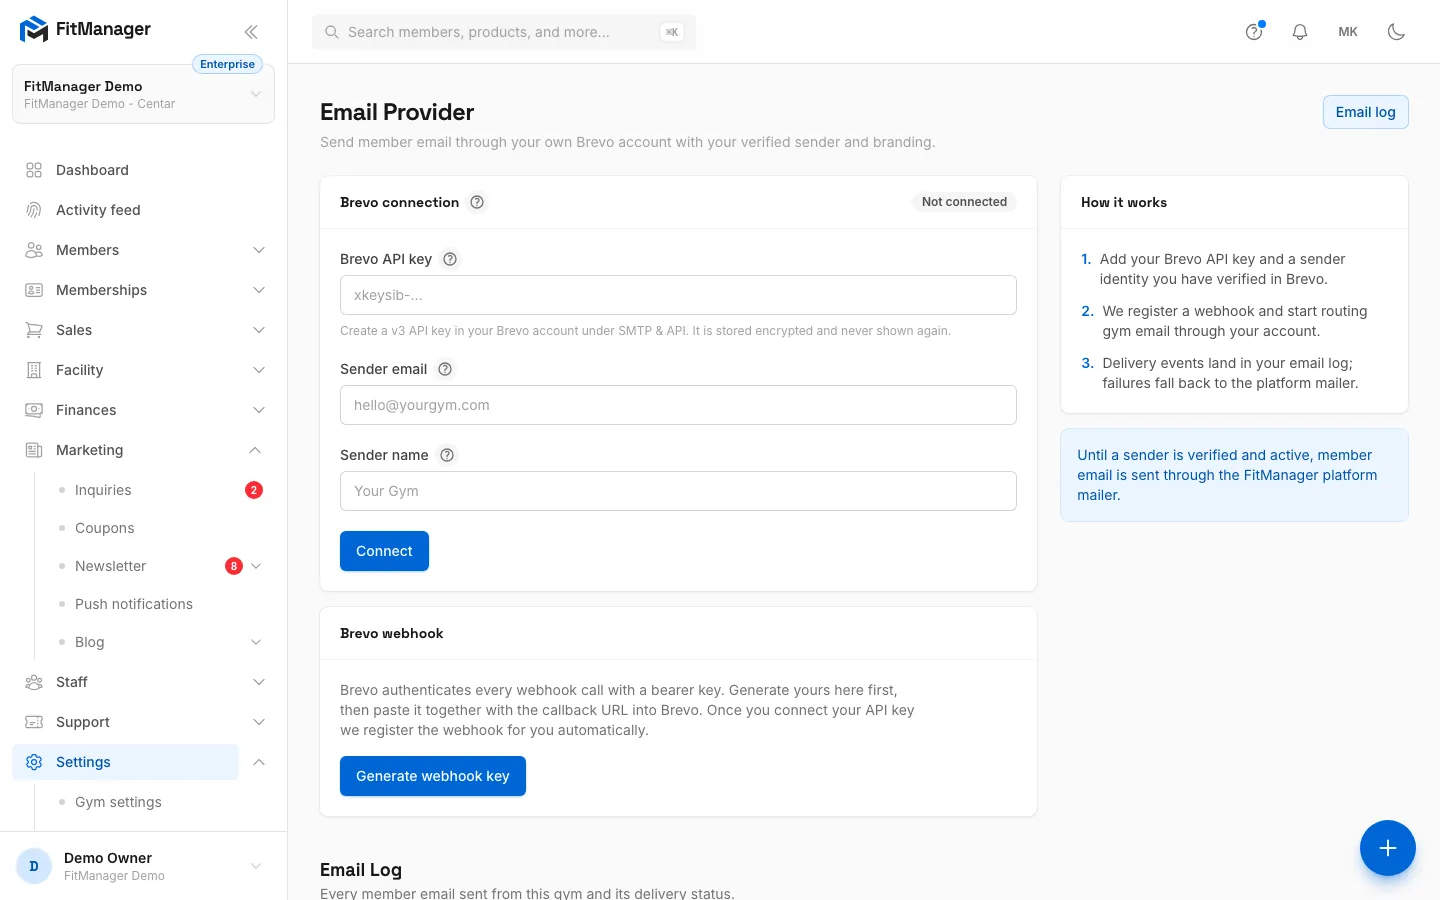
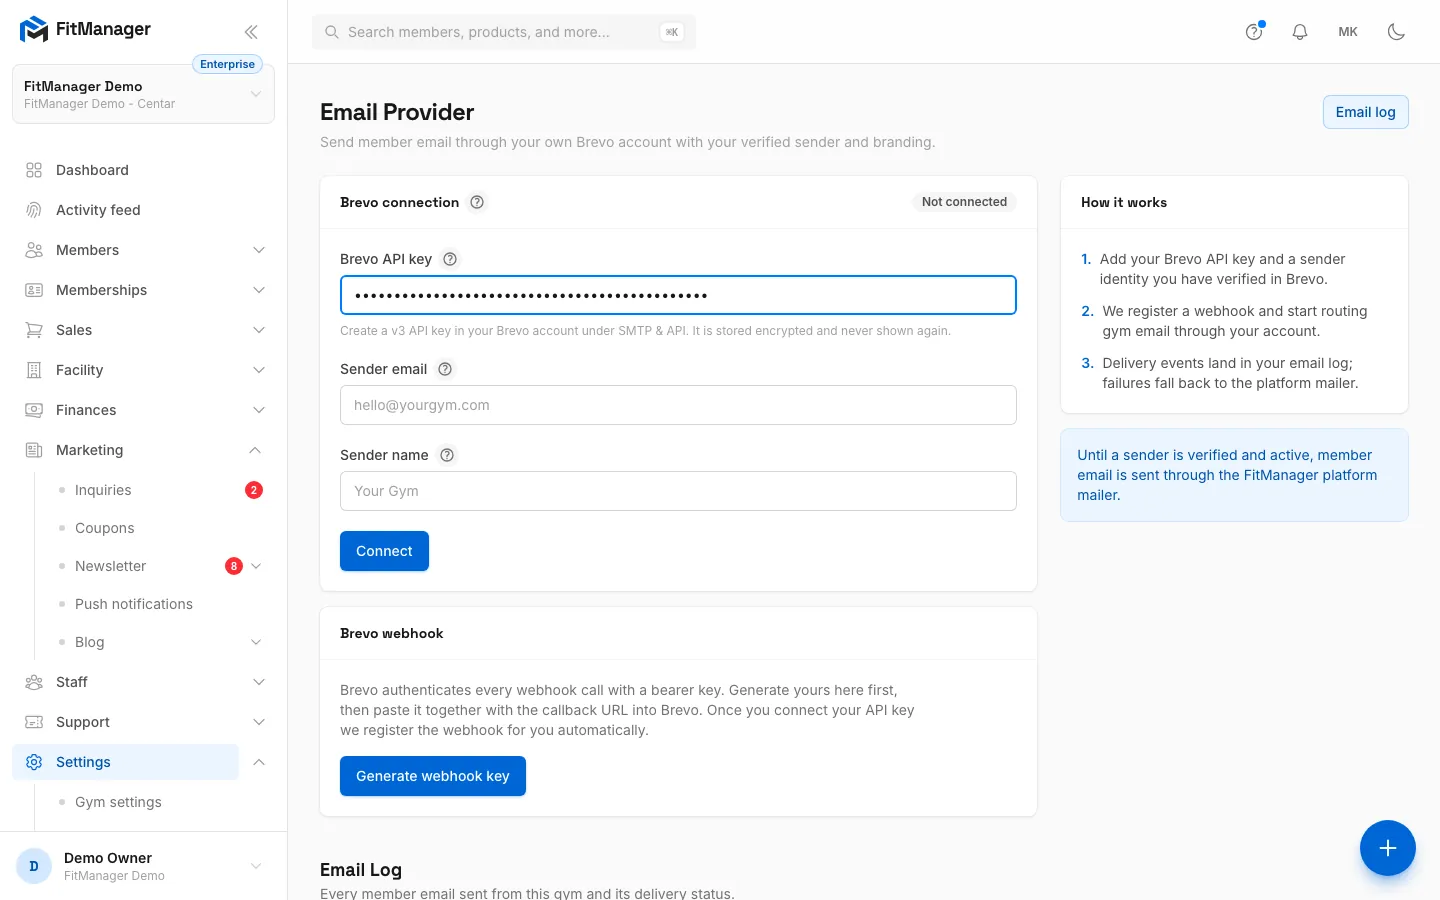
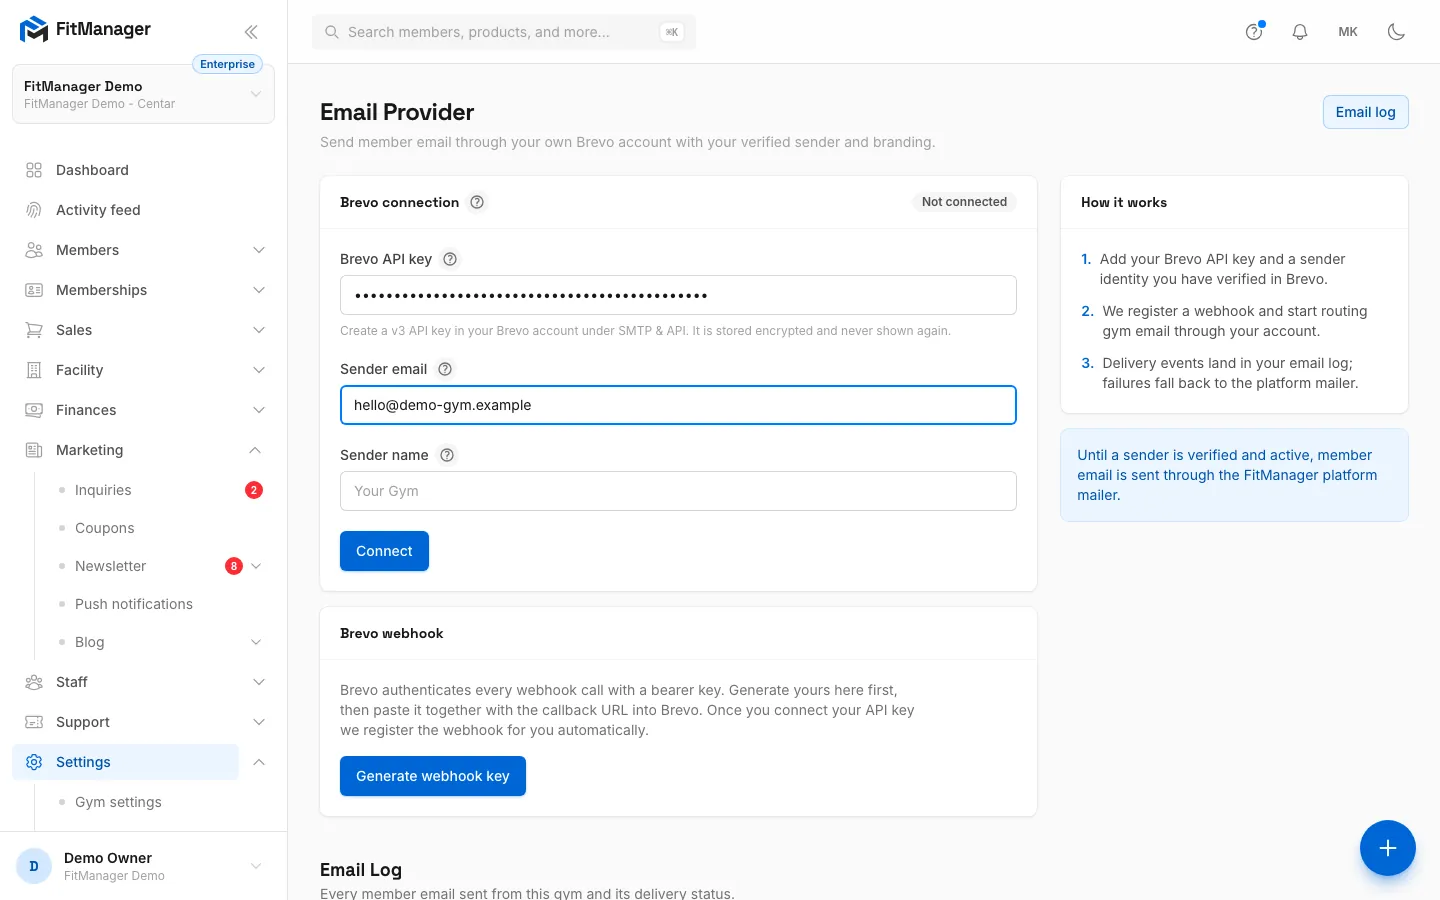
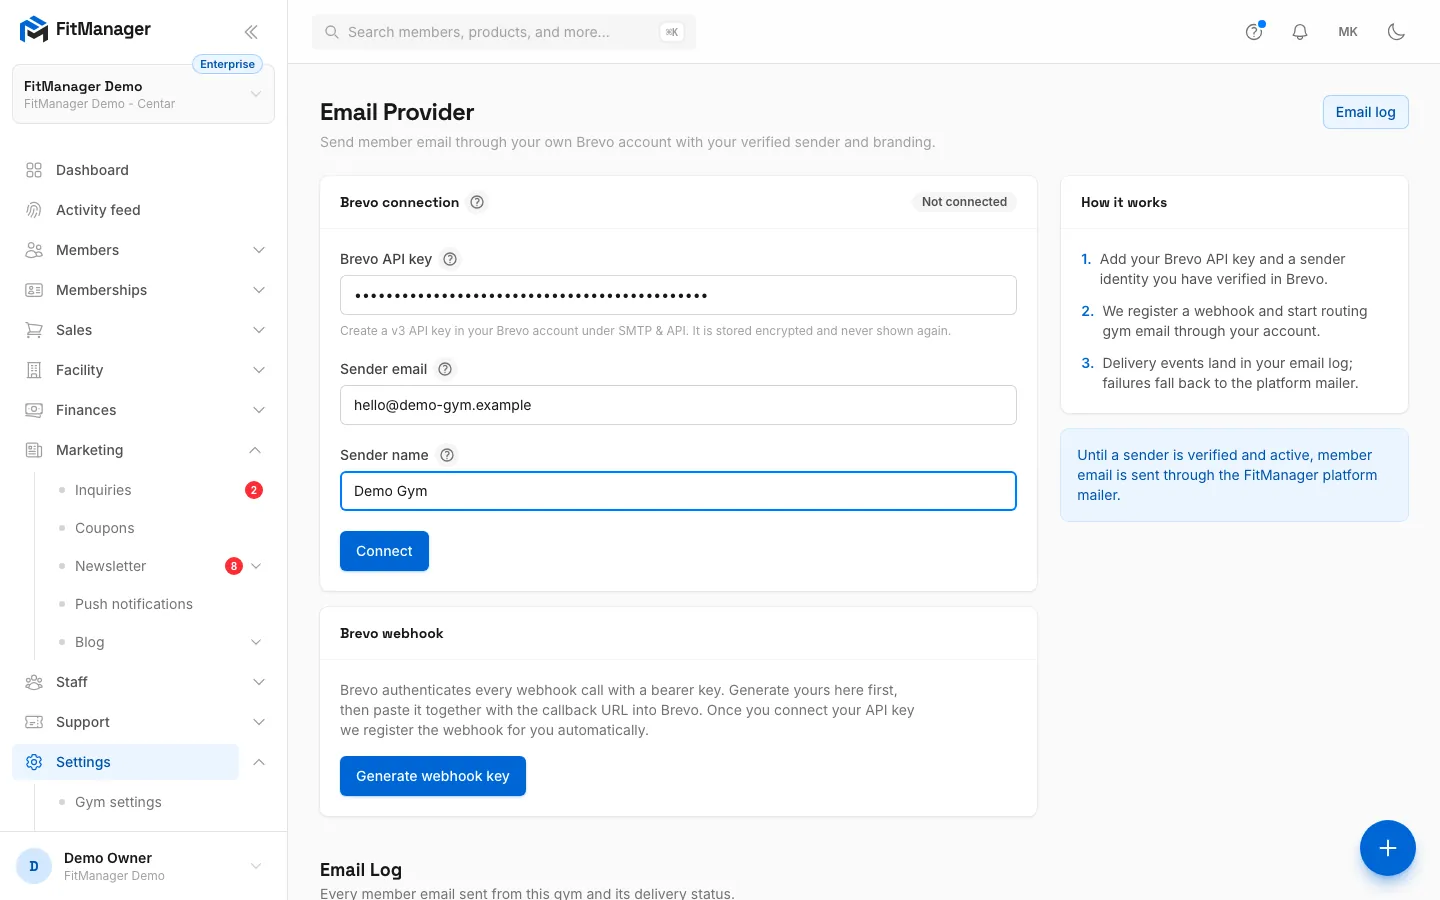
- Step 1: Open Settings, Integrations, Email. The Brevo connection card is where your key goes.
- Step 2: Paste the v3 API key you created in Brevo under SMTP & API. It starts with xkeysib-.
- Step 3: Enter the sender email exactly as it is verified in Brevo.
- Step 4: Enter the name members see in their inbox.
- Step 5: Click Connect. FitManager checks the key and the sender with Brevo and registers the webhook.
- Step 6: The webhook card brings delivery events back. You only set it up by hand if automatic registration fails.
- Go to Settings, Integrations, Email.
- In Brevo API key, paste the key from step 4.
- In Sender email, enter the sender address from step 3.
- In Sender name, enter the name members see in their inbox.
- Click Connect.
FitManager checks the key with Brevo, looks up your sender and registers a webhook in your Brevo account. The badge on the Brevo connection card then shows one of these:
| Status | What it means |
|---|---|
| Active | The key works and the sender is verified. Member email now goes through your Brevo account. |
| Pending verification | The key works, but Brevo does not list the sender as verified yet. Email still goes through the platform. Finish step 3, then click Re-check sender. |
| Error | A send through Brevo failed. The Last send failed box shows Brevo's message. That email, and those after it, went out through the platform. Fix the cause and click Re-check sender. |
| Not connected | No key has been saved. |
The API key is stored encrypted and is never shown again. The field shows •••• (connected) instead.
Step 6: Check the webhook
The webhook is how Brevo tells FitManager that an email was delivered, opened, clicked or bounced. The Brevo webhook card shows its state:
- Receiving events: Brevo is reporting deliveries. Nothing to do.
- Registered, no events yet: FitManager registered the webhook. Events start with the first email sent through your account.
- Not registered: Brevo refused the automatic registration, for example because of your Brevo plan. Add it by hand, below.
- Platform mailer: your sender is not active yet, so there is nothing to track.
Add the webhook by hand
You only need this when the card says Not registered, or when you want to set the webhook up before you connect the API key. In that case, click Generate webhook key first.
- In FitManager, copy the Webhook key and the Callback URL from the Brevo webhook card.
- In Brevo, open Transactional, then Settings, then Webhooks.
- Click Add a new webhook and paste the Callback URL.
- Under authentication, choose Bearer token and paste the Webhook key.
- Tick these events: Delivered, Opened, Clicked, Hard bounce, Soft bounce, Blocked, Spam, Invalid email, Unsubscribed and Error. Save.
- Send yourself a test, for example by adding yourself as a member, and check that it appears in the email log with a delivery status.
Use a transactional webhook. Brevo's marketing webhooks are separate and do not track the email FitManager sends.
Regenerate key
Regenerate key replaces the webhook key and the callback URL. The old pair stops working at once. FitManager re-registers the automatic webhook for you, but a webhook you added by hand must be updated in Brevo with the new key and URL.
Change or remove the connection
- Update connection: paste a new API key, or change the sender, and click it. The webhook is registered again.
- Re-check sender: asks Brevo again whether the sender is verified. Use it after verifying the sender, or after an Error.
- Disconnect: removes the key and the webhook. Member email falls back to the platform mailer right away.
Fallback to the platform mailer
Your members always get their email. Until the sender is Active, and whenever a send through Brevo fails, FitManager sends the message through its own platform mailer instead. Those emails show Platform under Sent via in the email log, and no delivery events are reported for them.
Troubleshooting
"That Brevo API key was rejected"
Brevo did not accept the key. Check that you copied the whole key, that it is an API key (it starts with xkeysib-, not an SMTP password) and that it has not been deleted in Brevo. If your Brevo account blocks unknown IP addresses for API calls, Brevo asks you by email to authorise the new IP; approve it, or turn that restriction off under Brevo's security settings, then click Connect again.
The status stays at Pending verification
FitManager looks for a sender with exactly the address in Sender email and checks that Brevo marks it active. Make sure the address matches the one in Brevo letter for letter and that the sender is verified, then click Re-check sender. If the sender does not exist in Brevo at all, the status also stays pending.
The status changed to Error
A send through Brevo failed, for example because the key was deleted, the account is suspended or the daily limit was reached. Read the Last send failed message, fix the cause in Brevo, then click Re-check sender to switch back to Active. Until then, email keeps going out through the platform.
Emails show as Bounced or Suppressed
Bounced means the receiving server rejected the email, usually because the address does not exist. Suppressed means Brevo did not deliver it because the address is blocked, unsubscribed or reported the email as spam. Correct the member's address, or check the address in Brevo's blocked contacts list. See Email log.
Email lands in spam
Check that your domain shows as authenticated in Brevo (step 2) and that the sender email is on that domain. Email from an unauthenticated domain or a free mailbox such as Gmail is often filtered.
Was this page helpful?
Related articles
Still stuck?
Write to us and we will get back to you within one working day.