Self-service kiosk
Let members buy memberships, products and gift cards on a touch screen with a card terminal, with a fiscal receipt or an emailed invoice, and no staff involved.
The FitManager Kiosk is a full-screen touch app for a PC or tablet at your entrance. A member or a walk-in picks a membership, a product or a gift card, pays by card on the terminal beside the screen, and walks in with an active membership and a fiscal receipt or an emailed invoice. Nobody at reception has to do anything.
How it fits together
| Part | Where it runs | What it does |
|---|---|---|
| Kiosk settings in FitManager | Your dashboard | Decide what each kiosk sells and how it gives receipts. Every sale lands in your sales, members and reports. |
| FitManager Control | The kiosk PC (Windows) | Drives the card terminal and the fiscal printer, and passes orders between the screen and FitManager. |
| FitManager Kiosk app | The same PC, or an Android tablet on the same network | The screen the customer touches. It never touches card data or the printer. |
The order is always card first, receipt second, so a receipt is never printed for a card that was declined.
What you need
- The Self-service kiosk feature on your plan and the Manage settings permission in FitManager.
- A touch screen: a Windows 10 or 11 PC with a touch screen, or an Android 7.0+ tablet. A tablet still needs a Windows PC running Control on the same network.
- A card terminal from your bank, unattended and with a cash-register (ECR) connection. Ask for a test terminal for the first days.
- A fiscal printer (optional): the same Synergy or David models as at reception. Without one, the kiosk emails an invoice instead.
- FitManager Control installed on the PC, with the Kiosk tab switched on for your installation. The FitManager team switches it on: open a ticket if you do not see the tab. See Set up FitManager Control.
- A gym API key from Settings, Integrations, API integration.
Card terminal drivers
The kiosk drives terminals through Payten's cash-register interface. Those drivers are being finished against the bank's ECR specification. Until your terminal is confirmed, Control offers a Simulated terminal, which runs the whole sale with pretend payments, under a banner that says so, and does not report orders to FitManager. Contact support with your bank and terminal model before going live.
Step 1: Register the kiosk in FitManager
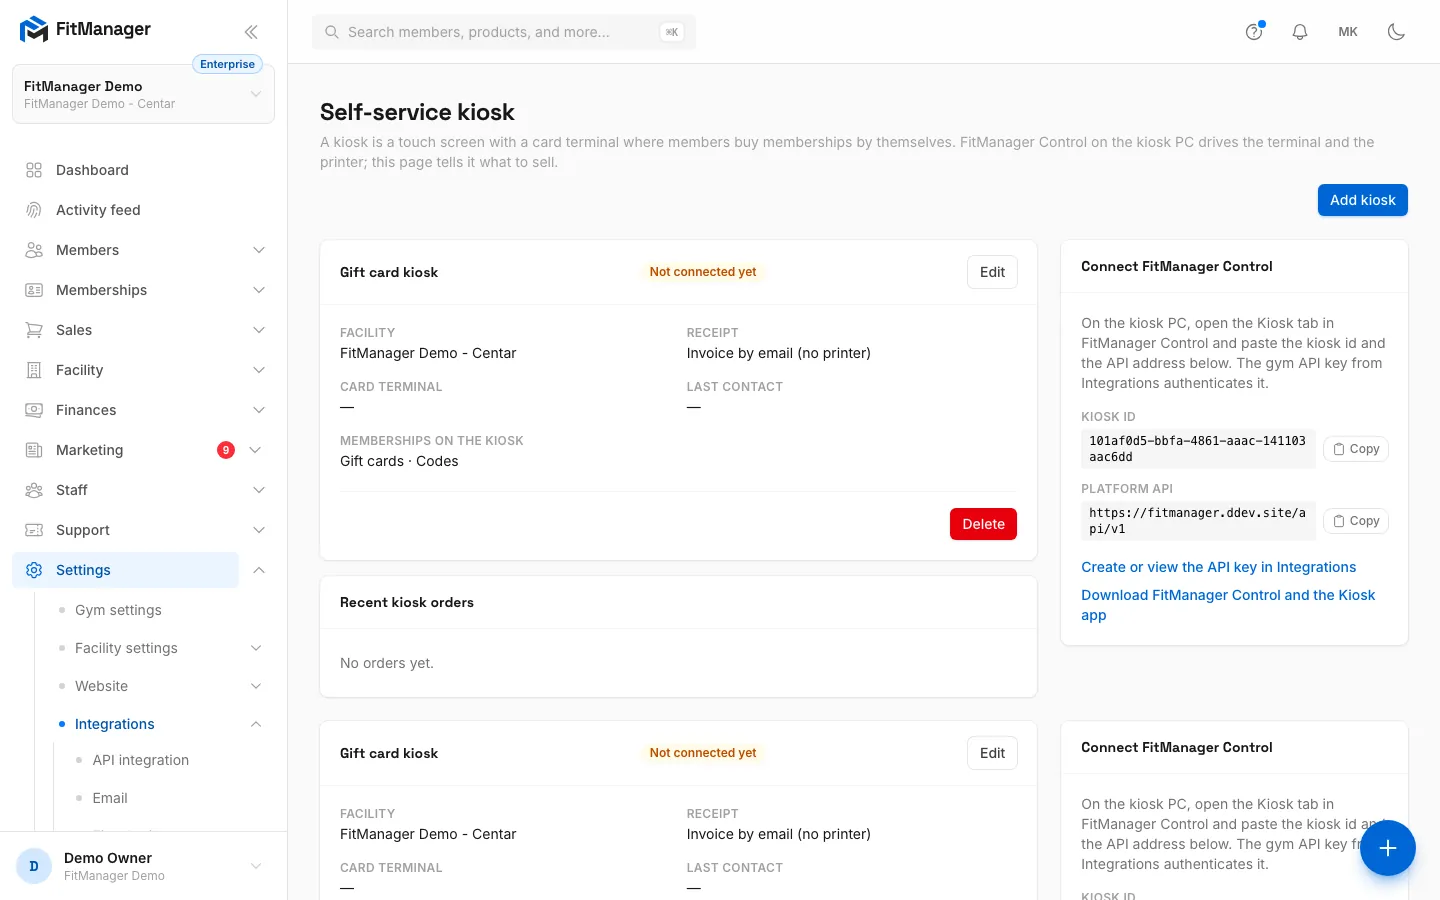
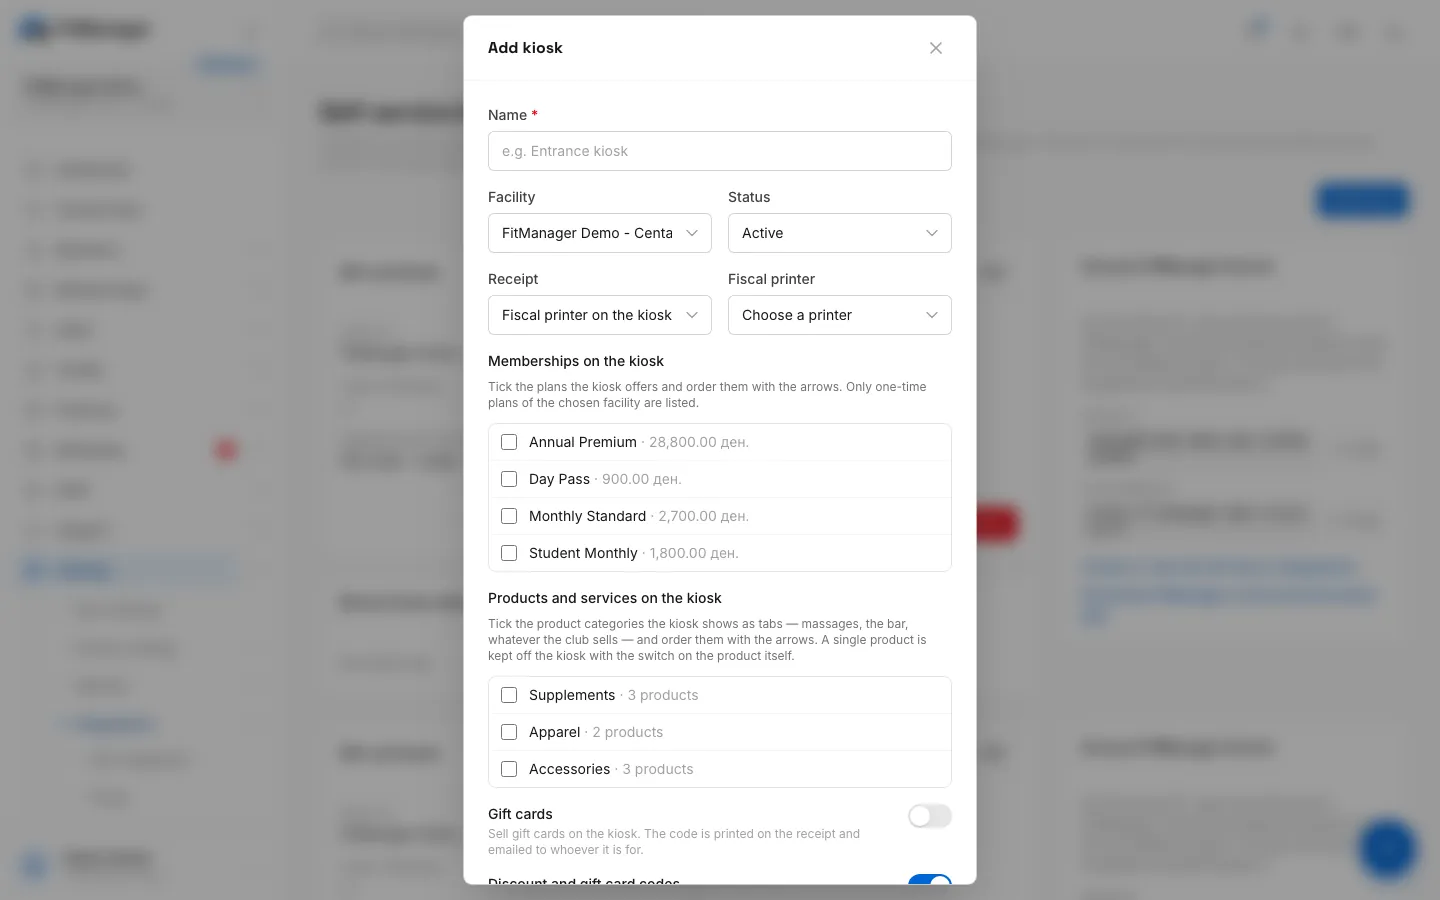
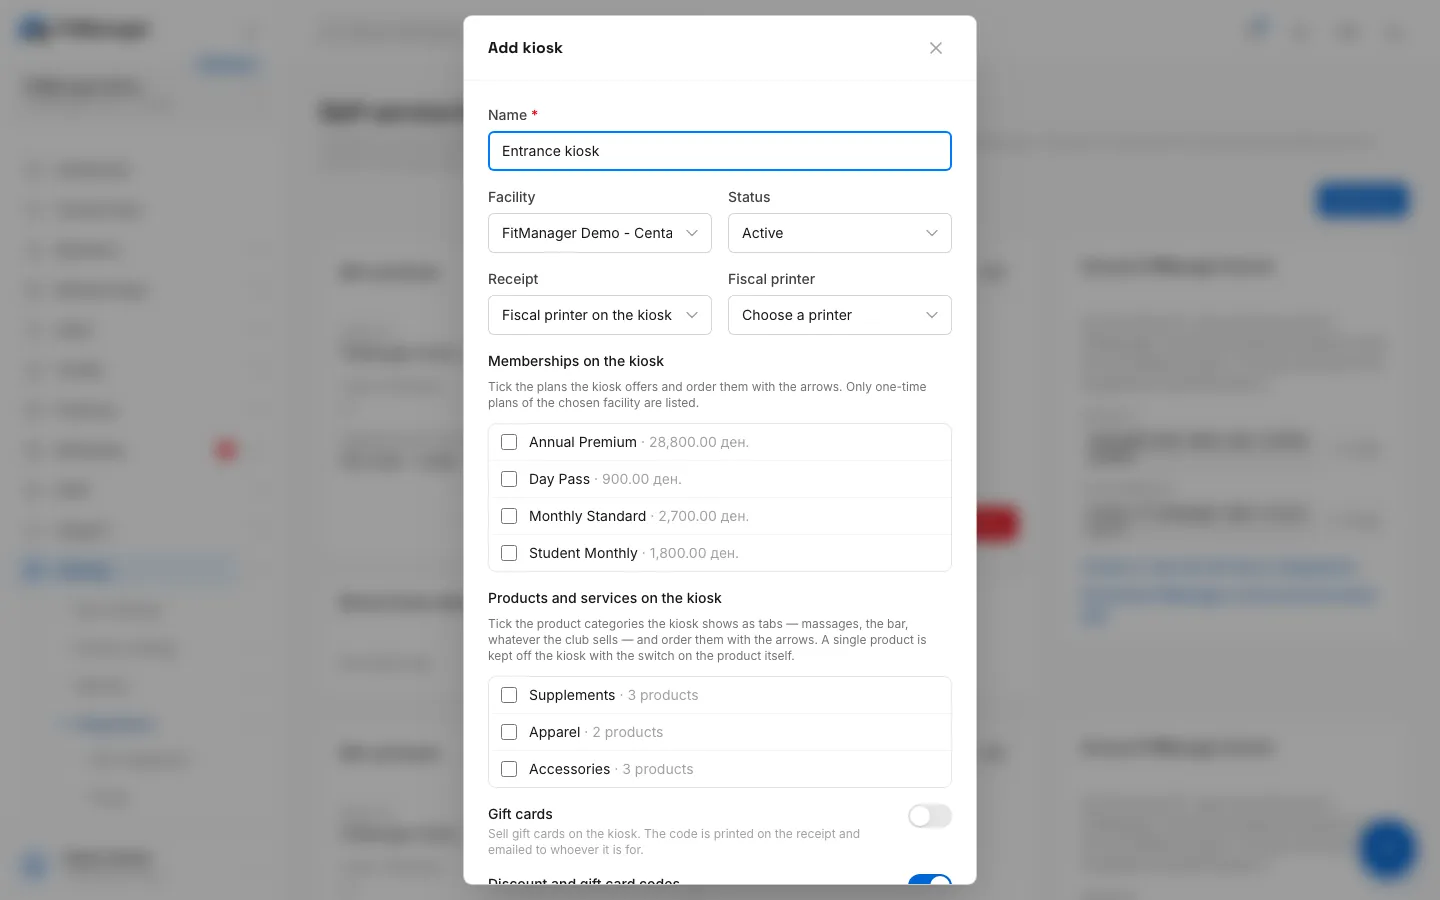
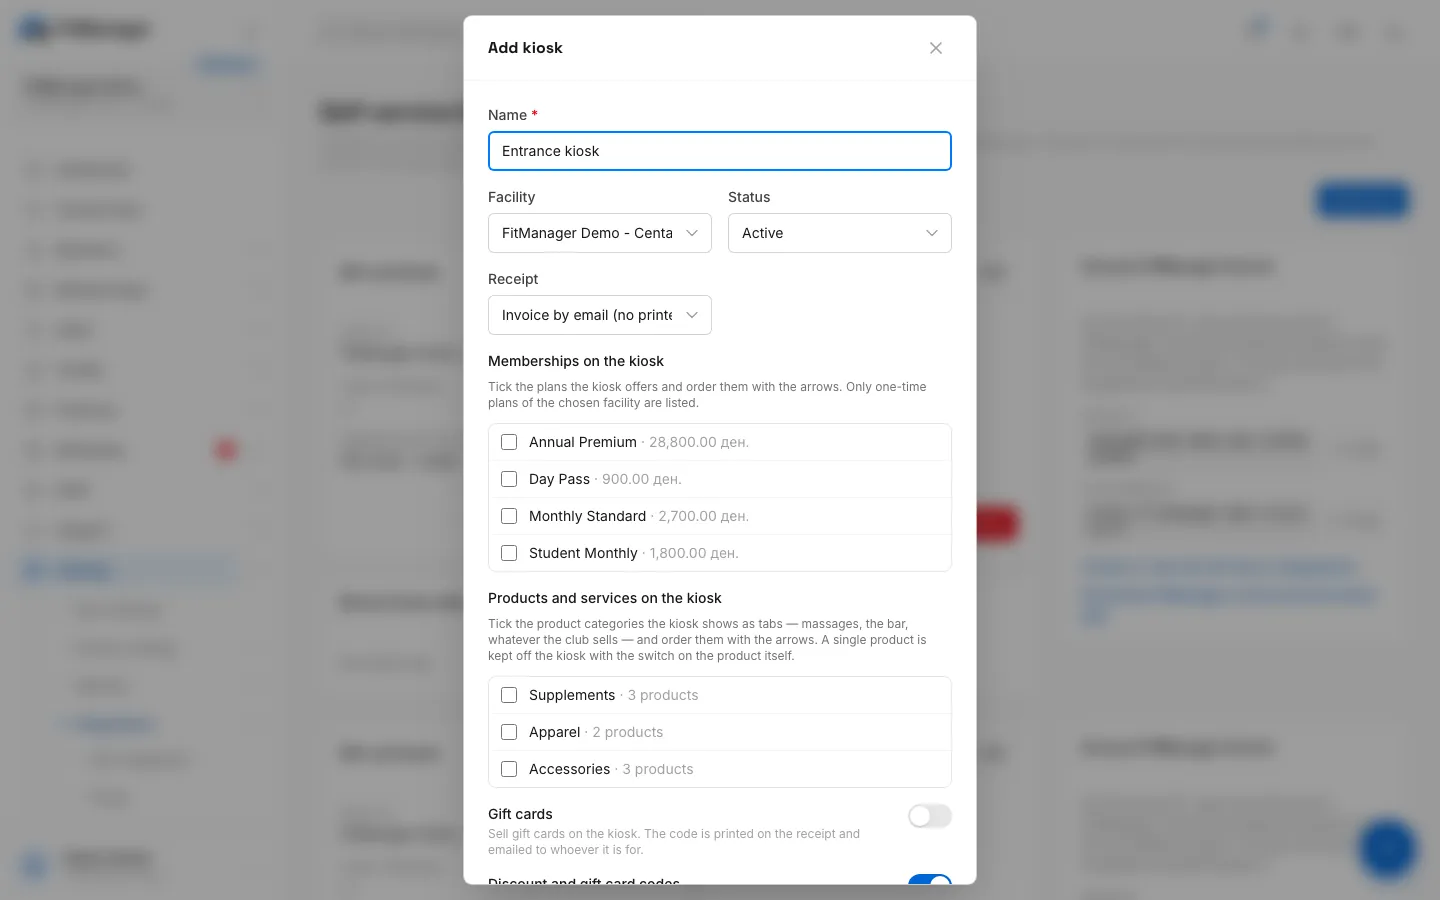
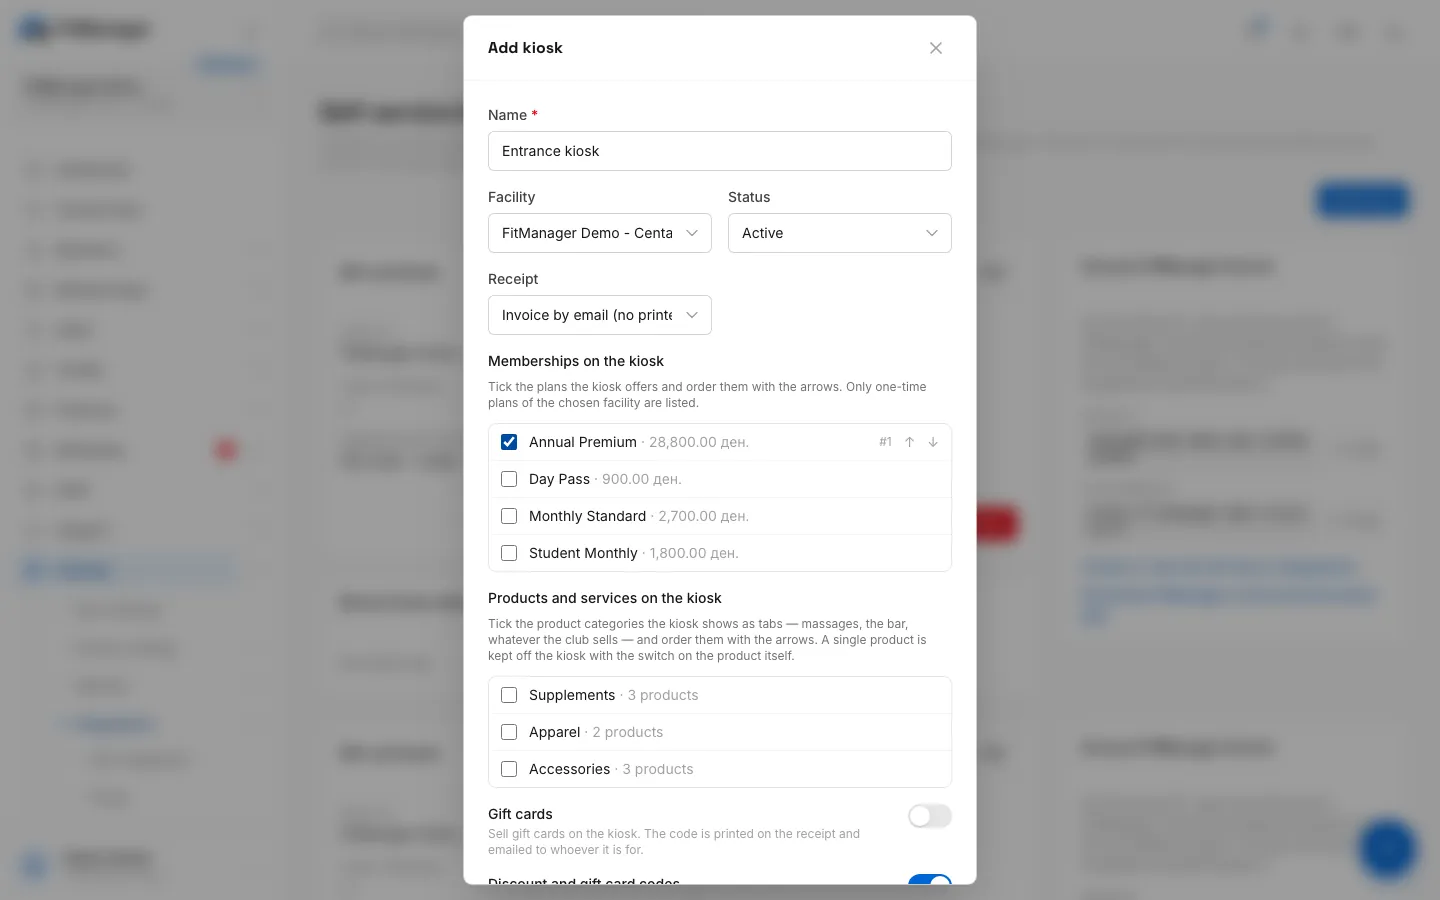
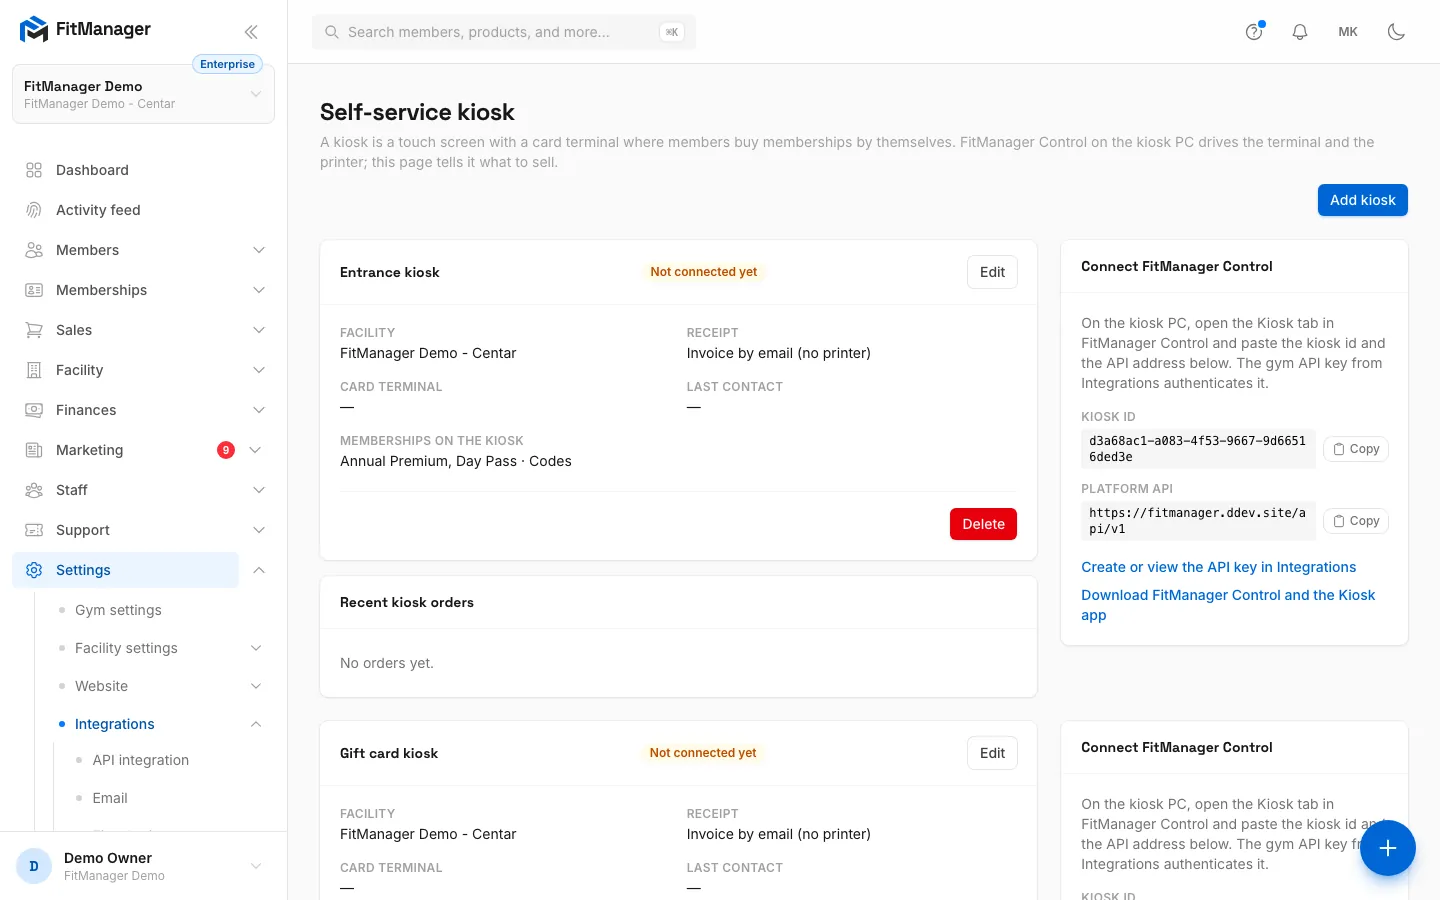
- Step 1: Under Settings, Integrations, Kiosk, click Add kiosk.
- Step 2: Name the kiosk after where it stands.
- Step 3: Choose the receipt, the fiscal printer on the kiosk PC or an invoice by email.
- Step 4: Tick the memberships the kiosk sells.
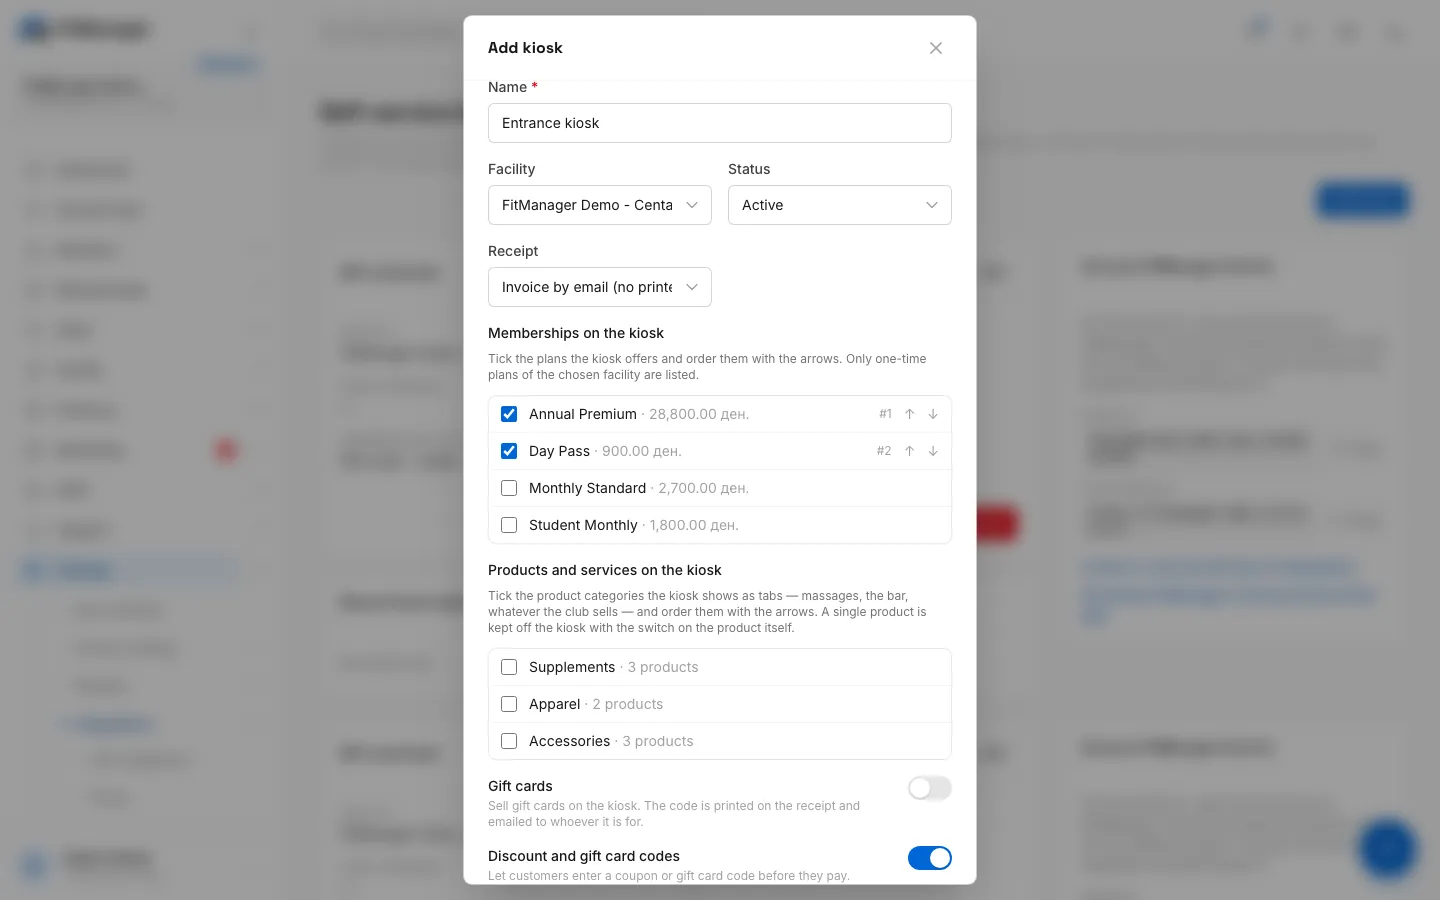
- Step 5: Tick more plans and put them in order with the arrows.
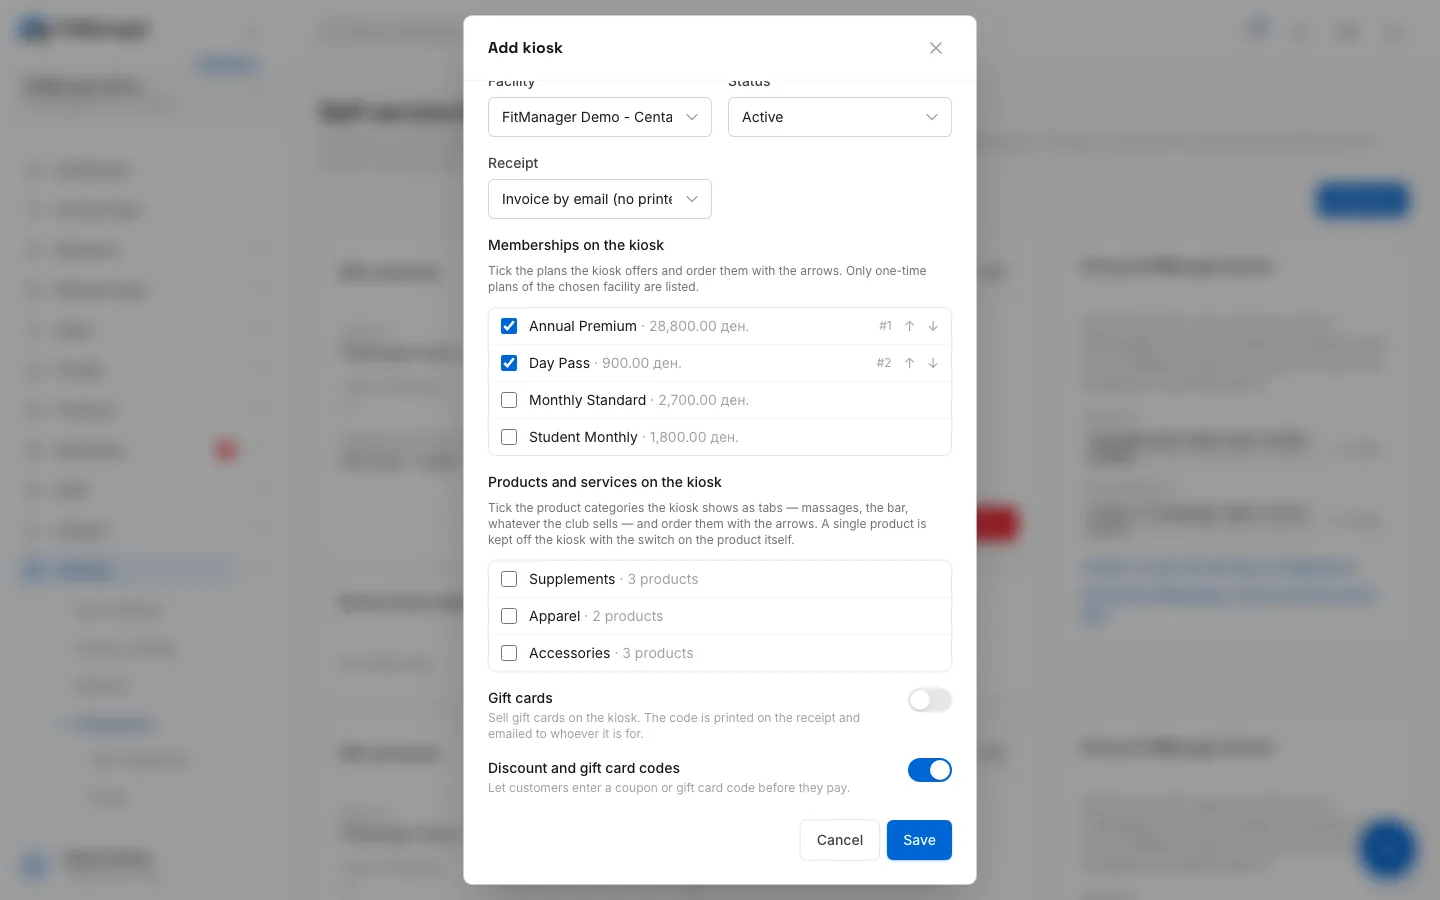
- Step 6: Leave codes on to let customers enter a coupon or gift card code before paying.
- Step 7: Click Save.
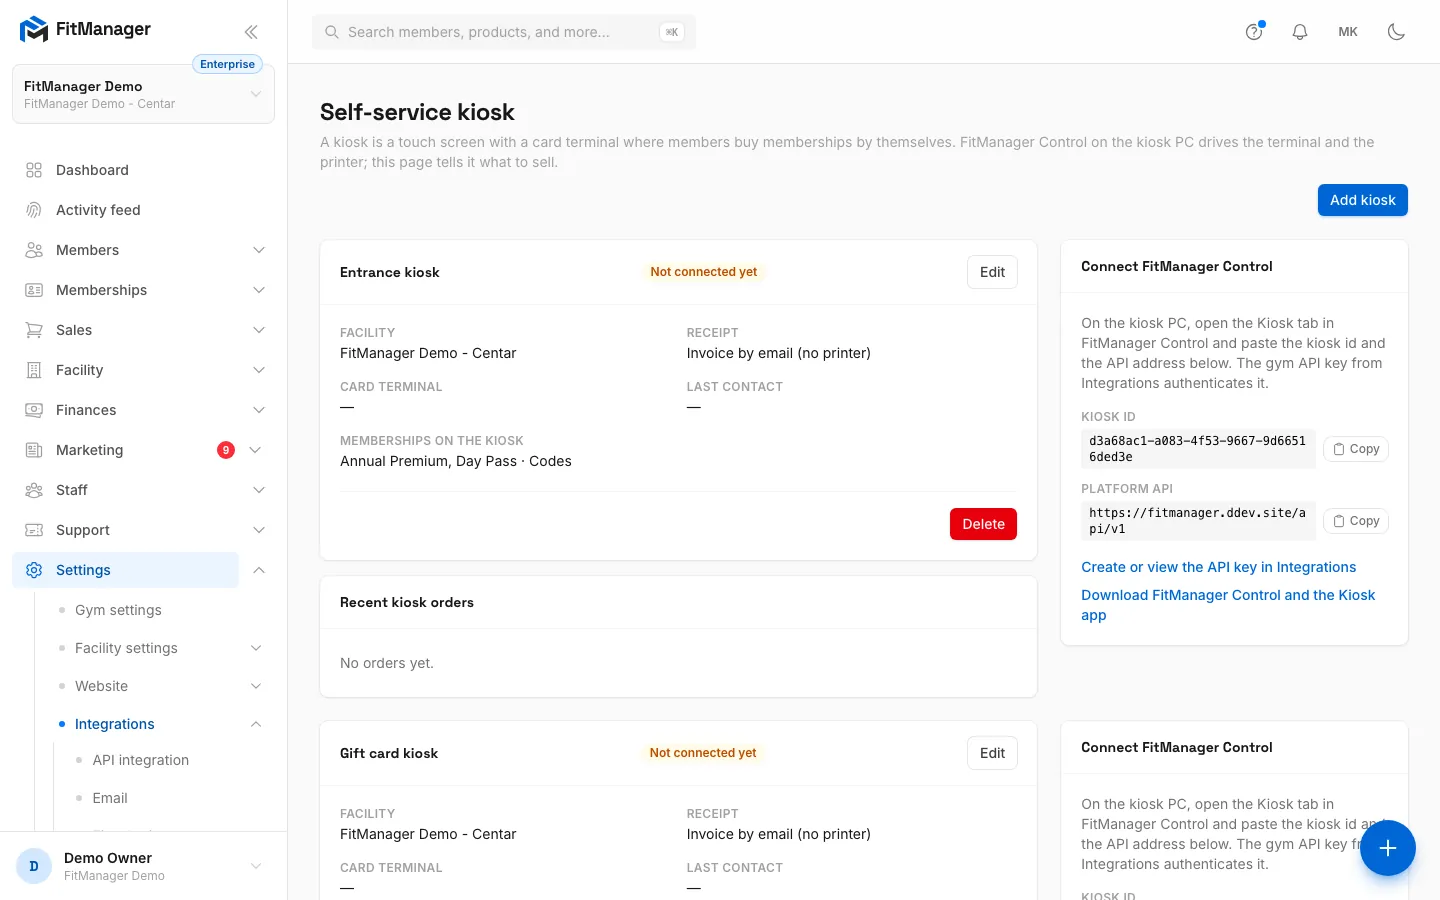
- Step 8: The kiosk card shows its receipt mode, terminal, last contact and what it sells.
- Step 9: Copy the Kiosk id and the Platform API into the Kiosk tab of FitManager Control.
- Open Settings, Integrations, Kiosk.
- Click Add kiosk.
- Fill in the form below and click Save.
| Field | What it does |
|---|---|
| Name | For example Entrance kiosk. |
| Facility | The facility the kiosk sells for. The lists below change with it. |
| Status | Active or Disabled. A disabled kiosk sells nothing. |
| Receipt | Fiscal printer on the kiosk PC, or Invoice by email (no printer). |
| Fiscal printer | With the printer option, the fiscal printer the kiosk prints on. Register it first. |
| Memberships on the kiosk | Tick the plans the kiosk sells and order them with the arrows. Only active one-time plans are listed. Subscriptions and partner-billed plans are not offered. |
| Products and services on the kiosk | Tick the product categories shown as tabs, such as Massages or Bar, and order them. Each category shows how many of its products are visible on the kiosk. |
| Offered after the choice | Products from the ticked categories offered once the customer has chosen, at most one of each. A bottle of water with a day pass, for example. |
| Gift cards | Sell gift cards in fixed amounts, and optionally an amount the customer types. See Gift cards. |
| Discount and gift card codes | Let customers enter a coupon or gift card code before they pay. On by default. |
A kiosk has to sell at least one thing: a membership, a product category or a gift card amount.
After saving, the kiosk's Connect FitManager Control box shows the Kiosk id and the Platform API address, each with a copy button.
Step 2: Set up FitManager Control on the kiosk PC
- Download FitManager Control from the Download FitManager Control and the Kiosk app link on the kiosk card, or from the Kiosk page on the FitManager website. Install and activate it as described in Set up FitManager Control.
- In Control, click Settings and paste the API key into Gym API bearer token.
- If the kiosk prints receipts, add the printer on the POS System tab first (+ Fiscal printer). Add the card terminal there too (+ Card terminal), so the kiosk can use it.
- Open the Kiosk tab and click + Kiosk.
- Fill in:
- Name, and tick This kiosk is in use.
- Platform API and Kiosk id: paste the two values from Step 1.
- Fiscal step: the printer on this PC, or an email invoice from FitManager. With a printer, choose it under Fiscal printer, and choose If printing fails: Reverse the card payment (the default) or Complete the sale, print later.
- Card terminal: the terminal beside the screen.
- App folder: where the Kiosk app is installed, and tick Start the Kiosk app with Control and restart it if it closes.
- Tick Local API enabled (the Kiosk app connects here), keep the port, and click Generate next to Kiosk token. Copy the token.
- Optionally, set the look under Design of the Kiosk screen: colours, gym name, logo, welcome photos or video, language, text size and the idle time. Changes show on the screen within seconds.
- Click Save, then Test sale to try the terminal.
Step 3: Install the Kiosk app
Download the app from the Kiosk page on the FitManager website: a ZIP for Windows or an APK for Android.
On the PC:
- Unzip it into a folder such as
C:\FitManagerKiosk. This is the App folder in Control. - Start
fitmanager_kiosk.exe. On its first start it opens the setup screen. - Paste the kiosk token, click Test connection, choose a staff PIN and save.
On an Android tablet:
- Download the APK on the tablet, allow the install and open FitManager Kiosk.
- On the setup screen, type the address of the PC running Control, for example
http://192.168.1.10:7420/. The PC needs a fixed address on your network. - Paste the kiosk token, test the connection, set the staff PIN and save.
To open the setup screen later, tap the top-left corner of the welcome screen five times, or press Ctrl+Alt+S on a keyboard, and enter the staff PIN.
Your memberships appear on the screen within seconds. Within a minute the kiosk in FitManager shows Online.
What happens on a sale
- The customer picks what to buy and identifies themselves: an existing member by card number, email or phone, or a new customer by name, email and phone.
- They can enter a coupon or gift card code, then pay on the terminal.
- When the card is approved, FitManager creates the member if they are new, activates the membership, records the sale as a card payment, and issues any gift card.
- The fiscal receipt prints on the kiosk's printer, or the invoice is emailed as a PDF with the number
K-....
Kiosk sales appear in Purchases with a Kiosk badge, count in your earnings like any POS sale, and are split out under By Source in Reports. Their fiscal receipts appear in the printer's fiscal journal.
If the printer fails after the card was approved and Control is set to complete the sale anyway, the receipt is queued and prints when the printer is back.
The kiosk card and its orders
Each kiosk on Settings, Integrations, Kiosk shows its state (Online, Offline, Not connected yet or Disabled), Facility, Receipt, Card terminal, Last contact with the Control version, and what it sells. Edit changes the settings. Delete removes the kiosk, and its orders are kept.
Recent kiosk orders lists the last ten orders with the time, reference, item, customer, amount and state, such as Completed, Declined, Unknown payment or Failed. A completed order links to its sale number.
Resolve an unknown payment
If the terminal lost contact after the card was read, the order shows Unknown payment and a warning at the top of the page says how many need a look.
- Check the terminal's receipt or your bank statement for that amount.
- Click Card was charged if the money was taken. After you confirm, the sale is completed and the membership activated.
- Click Not charged if it was not. The order is marked failed.
Resend an invoice
For a kiosk in email mode, a completed order shows invoice emailed when the invoice went out. If it failed or the customer lost it, click Resend invoice. Invoices go through your gym's email settings and appear in the email log.
Troubleshooting
| What you see | What to do |
|---|---|
| Choose the fiscal printer, or switch the receipt to email. | The receipt is set to the printer but none is chosen. Register a printer first, or use email. |
| Pick at least one membership, product category or gift card amount. | The kiosk has nothing to sell yet. |
| This facility has no active membership plans yet. | Create a one-time plan for the facility. See Create a plan. |
| The kiosk stays Not connected yet | Check the Kiosk id, Platform API and Gym API bearer token in Control, and that the kiosk is ticked as in use. |
| The screen says payments are simulated | The terminal in Control is set to the Simulated terminal. Sales are not real and are not sent to FitManager. |
| The invoice could not be sent | The customer gave no email address, or your mail provider refused it. Check the email log. |
Was this page helpful?
Related articles
Still stuck?
Write to us and we will get back to you within one working day.